


My husband and I bought our first house in 2003. It was a complete gut job — top to bottom, inside and out. We saw an opportunity to purchase a modestly-priced lakefront home, and, with the help of a remodel loan and a contractor, shape it into exactly what we wanted. This was eons before we ever watched the DIY network (I’m not even sure we could afford cable at the time), and long before Joanna Gaines forever changed the face of remodeling.
That was six houses, a few minor remodels, a couple more major remodels, and many, many DIY projects ago. If there is one thing we learned from that first house, it’s that we love a good home improvement project. We also learned that we make a pretty good team with our design visions, and that it usually pays off pretty well when selling to continue to upgrade and improve a property. However, we don’t have the budget (or the patience, let’s be real) to hire a contractor at every whim. So, DIY just became our way of life…our friends laugh because it seems we never stop remodeling, but we love it! It is our thing.

With that being said, note that this advice comes to you from one simple DIYer to another. These are helpful tips I have learned in my own home, on my own projects, on my own dime. I certainly encourage everyone to seek out other sources of advice and/or a professional opinion before tackling a major project like kitchen cabinets. Facebook groups like this one are also great places to use the group’s search feature or ask questions specific to your project and receive (usually) a plethora of feedback.
Painting kitchen cabinets is a huge undertaking, but, when done right, extremely worth the work. I know how expensive it is to remodel a kitchen (oh goodness, trust me, I KNOW) and if you can spend $200 to update instead of $10,000+ on cabinets, that’s a great option to explore.
Study and Practice
Nobody gets to be a good DIYer without practicing and studying the craft a bit. I can remember a few early projects that were total fails…a nightstand that the paint didn’t adhere because I didn’t prep properly, or a table that had funky brush strokes, or a particular topcoat that yellowed white paint.
This is why I beg you…DO NOT let painting your kitchen cabinets be your first DIY project! This is a project that has to be taken on with extreme care or you could risk wrecking thousands of dollars worth of cabinets. Trust me, practice first!
Start with a dresser or a nightstand, or even some old cabinet doors from the Habitat ReStore. This will help you get the feel for what kind of prep work is involved, how brush strokes work and how you may desire them to look, and it may even help you troubleshoot common problems. These are all important learning experiences that you can tuck away in your toolbox of knowledge — and, speaking of toolboxes, get yourself familiar with one!
The two best pieces of advice I can give when painting cabinets or furniture are: don’t rush it, and make sure you prep properly. Prep is 100% most important and can take more time than the actual paint. If the furniture/cabinets aren’t prepped properly, the paint might not adhere and that’s a complete nightmare.
Most Important: Preparing to Paint
- Set up a workspace with drop cloths and saw horses or some sort of surface to work on. Keep in mind that this could be here awhile, so choose a space that can be dedicated to the project. Also note that the temperature needs to remain above 50 degrees for paint to adhere properly. Read more about the proper temperature conditions here.
- Remove doors, drawers, knobs, hinges — anything removable that will get in the way of paint, take it off. Clean hardware with a vinegar solution and/or dish soap. This is a great time to update hinges and handles, too! Don’t forget to label all the doors so you know which ones go where.
- Decide if you want to paint the insides of cabinet doors, drawers, or shelves. I usually skip the insides of cabinets because of the additional work involved. Painter’s tape on the inside edges of the door will leave crisp paint lines and help avoid that rogue brush stroke or paint drip inside.
- Scrub well using a mild degreaser such as Dawn dish soap and warm water. If they are really dirty or greasy, you can use denatured alcohol or TSP on this step. TSP really works well, but it can leave a residue that interferes with paint adhesion, so it is CRUCIAL to rinse twice with a fresh rag and clean, warm water each time before moving on to the next step.
- Once dry, do a light scuff sand — it should not need aggressive sanding. Grab a 180-220 grit sanding pad and just scrub over it like you would in your wipe down. It goes quickly. (This assumes that you are working with standard stained or painted wood. If your surface has a high gloss or thick, impenetrable coat of polyurethane, you will want to do some additional research.)
- Wipe again to remove dust and then wipe down with a clean cloth and a 50/50 mix of denatured alcohol and water. Allow to dry completely before moving on.
The Main Event: Painting
Brushes
The first thing to determine is what kind of brush to use. There are a lot of options and a lot of opinions here. I personally love a short-handled, two-inch, angled brush like this. It fits nicely in my hand and the angle is important for edge and trim work, such as the inset panels on cabinet doors. You may choose a longer-handled brush or even a round brush like this. It just depends what feels comfortable to you. I recommend going with a high quality brush that has medium firmness: firmer brushes are helpful for angles and straight lines, but softer brushes leave less brush strokes, so I go for the happy medium.
Technique
When it comes to painting techniques, this is where practice is imperative. Understand how much paint should go on the brush, how far it will go, and how fast it will dry. Make sure brush strokes follow the wood grain and keep to one direction rather than going back and forth. Be consistent with the order in which you paint a paneled door; I find it easier to start with edges so I can pick doors up to do edges, then move inward from there.
Primer
It’s wise to put a primer coat on all surfaces. Some paints claim a primer is not necessary, and sometimes it isn’t. But when painting stained wood like cabinets, I would rather be safe than sorry. By that, I mean…I would rather not waste the expensive paint and then realize the old stain or tannins in the wood are bleeding through. On a light-colored paint, this could show up as overall yellowing of the paint, individual spots of bleed through, or yellowing/redness in the wood grain areas.
Note: if you decide to skip primer and then get bleed through, you can still add the primer right over top before going back to paint. I also swear by Zinsser Bullseye Shellac for this purpose. Usually a coat of clear shellac will serve the same purpose of blocking, and the bonus is, it’s much thinner so it goes farther and faster without as much care needed on brush strokes.
Primers I like:
- Zinsser Stain-Blocking Primer Although this is oil-based, you can use any topcoat with it.
- Sherwin Williams Premium Wall & Wood Primer I loved this when I used Sherwin Williams paint.
- Killz Original Primer Another brand well-known for stain-blocking and more.
Paint
Depending on your project, paint options run the gamut here. Chalk and milk paints are popular for furniture, but most require a topcoat, which isn’t always practical for a large project. There are all kinds of paints that are great for furniture and distressing techniques, but they are usually pretty expensive and best for smaller projects. These are definitely fun to play with, and I have quite a collection from my many furniture projects. If you are practicing on a piece of furniture before moving on to cabinets, I’d try to stick with the same paint on both so you get a good feel for it. Be sure to read paint and primer recommendations — while most stain-blocking primers work with any topcoat, not all topcoats work with all bases.
My favorite paints for cabinets, which I have personally used based on professional recommendations are:
- Sherwin Williams Pro Classic Cure time is longer, but it cures to a very hard, durable finish.
- Benjamin Moore Advance Very similar to the SW, this also cures hard as nails.
- General Finishes Milk Paint Requires a top coat, but for smaller spaces, this is a wonderful quality option.
You’ll likely need at least two coats of paint over the primer depending on how it covers. Some people like to use a high-grit sanding pad between coats to knock down the brush strokes. This is a great step to take to ensure a very smooth finish, but it also requires quite a bit of work. I found that focusing on lessening my brush strokes through painting technique was an easy shortcut for me. I do normally sand between coats on furniture. Recommended, but optional.
Keep in mind dry time and cure time are different, and be sure to understand what your brand of paint requires. The paint will dry and be able to be handled within a day or less, but the cure time can be up to 30 days for it to really harden. You can go ahead and hang doors and mount hardware, just be gentle with them until the paint has truly cured. Both the Sherwin Williams and Benjamin Moore paints cure to a very hard finish and do not require a top coat, but that again is up to you.
Kits, Stains, and Other Options
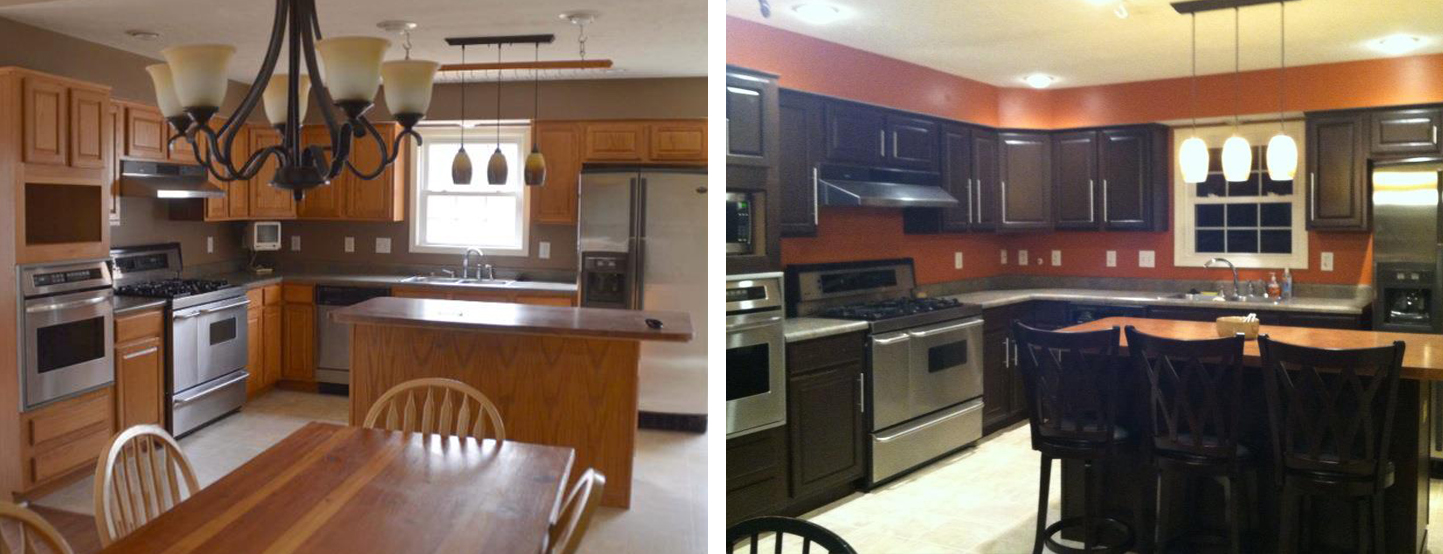
When you want to go from stain to stain rather than paint, I do like the Rustoleum Transformation kits. I first used this many years ago and was very happy with the results on the kitchen shown above. I have since used it on some bathroom cabinets and recommended it to many friends who also loved it. Best advice with this: just follow the directions exactly. As with painting, take care in prep and with brush strokes. Don’t skip the second coat because you think it looks dark enough…you’ll almost surely regret it!
Another great option is gel stain. This requires most of the same prep steps and then is an easy wipe on/wipe off process. The gel makes it easier to work with as it’s not drippy. Again, I love the General Finishes brand, but have used whatever I could find at the hardware store in a pinch with great results.
I have recently come to love oil-based paint. We used it on a recent remodel to paint paneling and it performed beautifully. I had a lot leftover, so I painted several dressers and just love the finish. The biggest downsides are that it really stinks and it is a pain to clean up, but it dries/cures nice and hard. Just keep the turpentine handy for cleanup and make sure you have great ventilation!
I hope I have given you some inspiration to start looking at some of your options through a different lens. Paint certainly isn’t the answer for everything (be careful with antique furniture!), but it can be a wonderful transformer for a lot of things!


